Are you looking for a delightful sewing project that offers both charm and functionality? This Bunny Backpack is the answer! With its adorable ears and fluffy paws, it’s a project that’s not only fun to make but also practical for kids and adults alike. In this article, we will guide you through the necessary materials, dimensions, and simple steps to create your very own Bunny Backpack.
Materials Needed
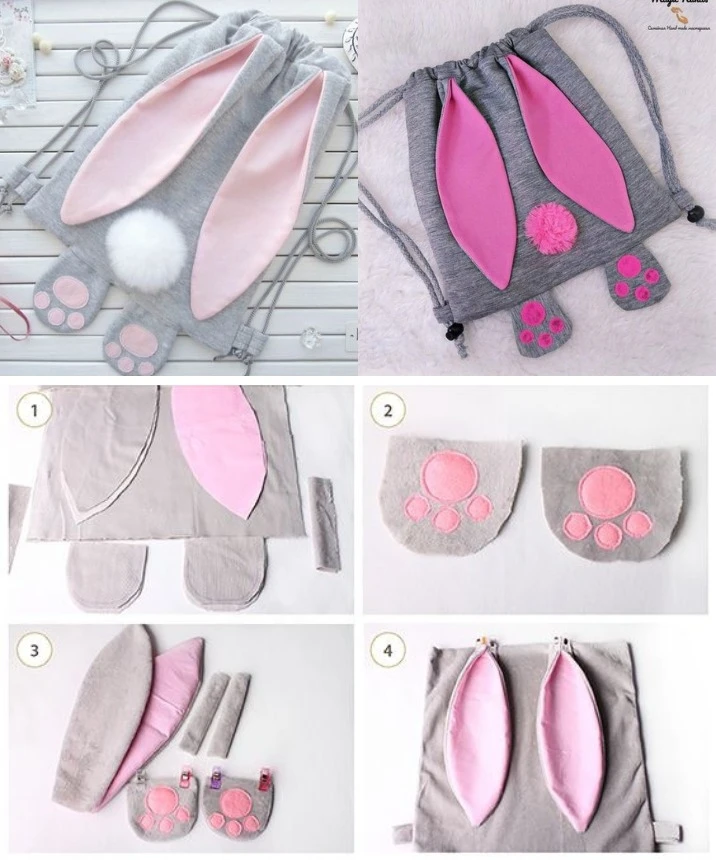
To create this delightful backpack, you will need the following materials:
Main Fabric: 50 cm x 70 cm (recommended: fleece or cotton)
Lining Fabric (optional): 50 cm x 70 cm
Pink Felt: for detailing the ears and paw pads
Cords: 2 pieces, each 90 cm long
Pom-Pom: roughly 5 cm in diameter for the tail
Thread: matching the fabric colors
Pins: for securing fabric pieces
Scissors: sharp enough for fabric cutting
Sewing Machine: for sewing the pieces together
Dimensions of the Pieces
Body of the Backpack
Height: 35 cm
Width: 28 cm
Ears
Length: 25 cm
Width: 8 cm (at the base)
Paws
Length: 10 cm
Width: 8 cm
Steps to Create Your Bunny Backpack
Step 1: Prepare the Pieces
Start by cutting the main fabric and the felt according to the dimensions provided. You will need to cut two rectangles for the body of the backpack, along with the ears and paws pieces. Don’t forget to cut out the pink felt shapes for the paw pads and the inner sections of the ears to give them a sweet touch!
Step 2: Assemble the Paws
Sew the pink felt pads onto the paw pieces. Once completed, stitch the paw pieces together, right sides facing each other, and then turn them right side out. Attach the paws to the bottom corners of the backpack body.
Step 3: Create the Ears
Sew the pink felt details onto the ear pieces. Then, stitch the ear pieces together, right sides facing, and turn them right side out. Attach the ears to the top of the backpack body, making sure they are secured well.
Step 4: Construct the Backpack Body
Place the two large body pieces right sides together, ensuring that the ears and paws are in position before you start sewing. Sew along the sides and the bottom, leaving the top open as the opening of the backpack.
Step 5: Install the Cord
To create the opening for the cords, fold down the top edge about 3 cm and sew down, leaving small openings on each side for the cord to pass through. Thread the cord through these openings, ensuring it tightens securely.
Step 6: Finishing Touches
Finally, attach the pom-pom at the bottom back of the backpack to serve as the cute bunny tail! Take a moment to check all the seams and reinforce them if necessary.
Tips for Customization
Choose Soft Fabrics: Using soft materials like fleece will not only feel nice but will also make your backpack look more appealing.
Personalize: Feel free to customize your backpack with different colors or fabrics to match your or your child’s style.
Add a Lining: Including a lining can strengthen the backpack’s structure and give it a more finished look.
This Bunny Backpack is not just a fun sewing project; it’s a charming and practical accessory that can be used daily or given as a thoughtful gift. Whether you’re crafting for yourself, your child, or a loved one, this project is sure to bring smiles and joy!
Happy sewing! 🐰🎒