Are you on the lookout for a simple and practical sewing project? Look no further! This adorable belt pouch is perfect for carrying your essential items while keeping your hands free. Whether you’re heading out for a leisurely walk, running errands, or attending a festival, this pouch will keep your belongings secure and stylishly accessible. Plus, it’s an easy project that requires minimal materials and sewing skills. Let’s get started!
Why You’ll Love This Project
Practical and Functional: The belt pouch is designed to hold small items like your phone, keys, and wallet, making it a great companion for any outing.
Stylish Accessory: Customize it to match your outfit and express your personal style.
Quick to Make: This project can be completed in just a few hours, perfect for a weekend afternoon.
Great Beginner Project: Even if you’re new to sewing, this pouch is an excellent way to practice your skills.
Materials Needed
To create your stylish belt pouch, you will need the following materials:
Outer Fabric: Choose a sturdy fabric like cotton or linen.
Lining Fabric: A complementary lining will add a polished finish.
Closure: A decorative button or a snap closure will keep your pouch securely fastened.
Matching Thread: Pick a thread color that corresponds with your fabric.
Sewing Tools: You’ll need a sewing machine, scissors, pins, and a ruler.
Step-by-Step Guide
Let’s break down the steps to create your belt pouch!
Step 1: Cut Your Fabric
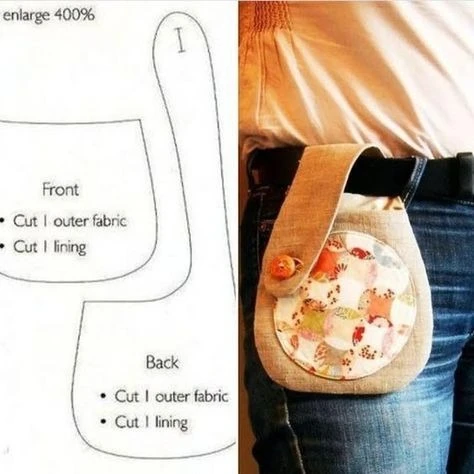
Front Piece: Cut one piece from the outer fabric and one from the lining fabric following the “Front” pattern.
Back Piece: Cut one piece from the outer fabric and one from the lining fabric using the “Back” pattern.
Strap: Cut the strap piece long enough to loop around your belt.
Step 2: Assemble the Pouch
Sew the Front: Place the front pieces (outer fabric and lining) together, right sides facing. Pin them in place and sew around the edges, leaving a small opening to turn it right side out.
Repeat for the Back: Follow the same procedure for the back pieces.
Step 3: Add the Strap
Create the Strap: Fold the strap piece in half lengthwise and sew the edges. Once finished, you’ll have a sturdy strap to attach to your belt.
Attach the Strap: Securely affix the strap to the back of the pouch.
Step 4: Final Assembly
Sew the Front and Back Together: Attach the front and back pieces by sewing the side and bottom edges, leaving the top open for easy access.
Closure: Add the button or snap closure to ensure that your pouch remains secure while on the go.
Step 5: Personalize Your Pouch
- To give your pouch a unique touch, consider adding a decorative button or a colorful snap closure. You might also want to include a small pocket on the front for extra storage.
Conclusion
This belt pouch is a quick, practical, and stylish project that can easily become a staple in your on-the-go lifestyle. With just a few steps and some creativity, you can create your very own pouch that’s tailored to your needs and tastes. Don’t forget to share your creations with friends and family or showcase them on social media!
Happy sewing! Let your creativity shine!