Are you looking for a chic and cozy addition to your wardrobe? The elegant turtleneck poncho is not only a stylish garment but also a practical project that’s perfect for sewing enthusiasts of all levels. With its sophisticated look and comfortable fit, you’ll want to wear it on various occasions. In this guide, we’ll provide you with step-by-step instructions and precise measurements to create your own stunning poncho.
Measurements
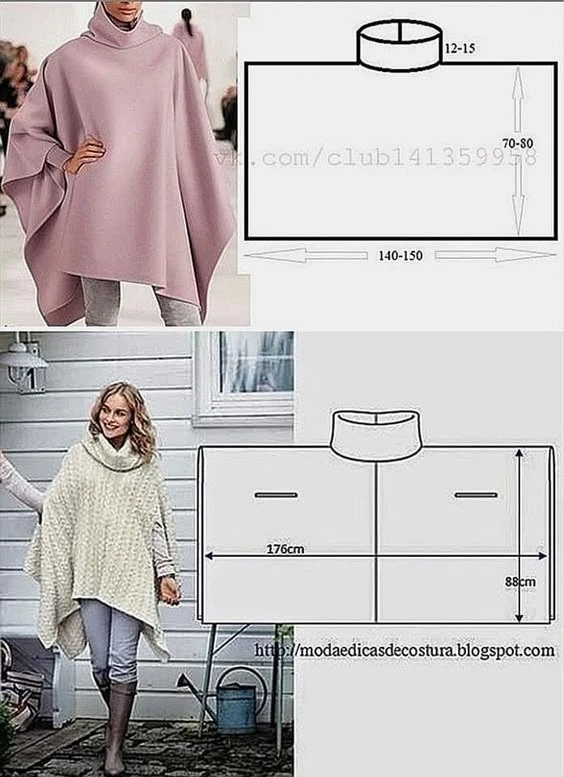
To get started, it’s essential to have the right measurements for your poncho. Here are the dimensions you will need:
Total Length: 140-150 cm (or 176 cm for the extended version)
Width: 70-80 cm (or 88 cm for the extended version)
Turtleneck Diameter: 12-15 cm in height
Arm Openings (Optional): Horizontal slits of about 20 cm, positioned approximately 35-40 cm from the top
Materials Needed
Before you begin, gather the following materials:
Fabric: Choose a thick fabric such as wool, cashmere, or a comfortable knit. For a lighter option, neoprene or blended wool works well.
Sewing Machine: Ensure your sewing machine is ready for the task.
Scissors: For cutting fabric.
Measuring Tape: To measure your fabric accurately.
Pins: To hold your fabric in place while sewing.
Thread: Choose a color that matches your fabric.
Step-by-Step Instructions
1. Preparing the Fabric
Start by measuring and cutting your fabric according to the chosen dimensions. For the basic poncho, cut a rectangle that measures 140-150 cm in length and 70-80 cm in width. If you’re opting for the extended version, use the dimensions of 176 cm in length and 88 cm in width.
2. Creating the Turtleneck
For the turtleneck, cut a strip of fabric measuring 12-15 cm in height. Sew this strip together along the long edge to create a tube. Once you have your tube, carefully attach it to the neckline of the main rectangle, ensuring the seams are aligned correctly.
3. Adding Arm Openings (Optional)
If you prefer to have arm openings, measure and cut horizontal slits approximately 20 cm deep on each side of the poncho. These openings should be about 35-40 cm from the top of the poncho for the best fit.
4. Final Assembly
After attaching the turtleneck and adding any optional arm openings, you can finish the poncho by hemming the edges. You can either create a simple hem or use bias tape for a cleaner finish.
Choosing the Right Fabric and Colors
When selecting fabric for your poncho, consider using soft wools or heavy knits that provide warmth and comfort. Neoprene is also an excellent choice if you want a structured look that holds its shape well.
For colors and patterns, pastels or neutral shades like pale pink or gray can create an elegant and understated look. Alternatively, darker tones can offer a classic and timeless style, perfect for any occasion.
Conclusion
The elegant turtleneck poncho is a versatile and fashionable piece that you can easily make at home. Whether you’re heading out for a casual day or dressing up for a special occasion, this poncho is sure to elevate your outfit. With the precise measurements and step-by-step instructions provided, you’re all set to create your own beautiful poncho!
Now it’s your turn! Grab your materials, unleash your creativity, and enjoy this delightful sewing project. Happy sewing!