Are you ready to add a sprinkle of joy to your home or create the perfect gift for someone special? With our easy guide, you can create a delightful plush bunny that is not only charming but also practical. This project is suitable for sewing enthusiasts of all levels, from beginners to seasoned pros. Let’s jump into the fluffy fun!
Project Overview
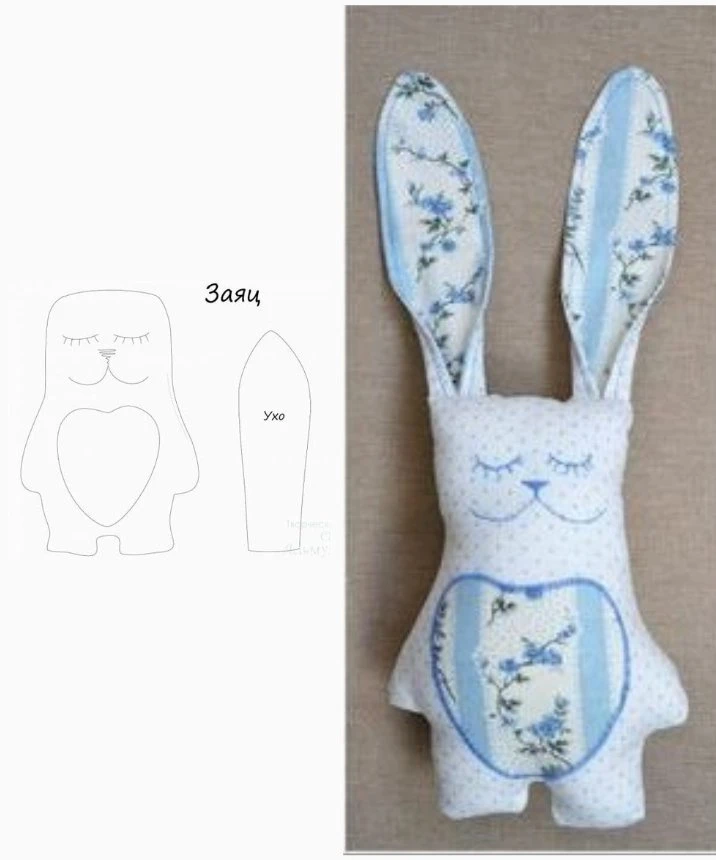
This adorable plush bunny will stand about 25-30 cm tall (including its ears) and have a body width of roughly 10-12 cm, making it the perfect size for both little ones and grown-ups to cuddle with.
Materials Needed
To get started, gather the following materials:
Fabric: Choose soft fabrics like cotton or flannel for a cozy touch. You can also opt for a floral pattern or any colors that inspire you.
Stuffing: Use hypoallergenic polyester fiberfill to give your bunny a cuddly shape.
Thread: Pick a color that matches or contrasts your fabric for a decorative touch.
Embroidery floss: For the eyes and nose, consider using embroidery floss for added charm.
Sewing tools: You’ll need scissors, a sewing machine (or needle and thread if you prefer hand sewing), pins, and a marker/chalk for tracing your pattern.
Step-by-Step Instructions
1. Prepare the Pattern
Start by printing the bunny pattern and cutting out the necessary shapes: the body, ears, and a decorative heart. This step sets the foundation for your bunny’s adorable features.
2. Cut the Fabric
Using your pattern pieces, cut two pieces for the body, two for the ears, and one for the heart from your chosen fabric. Consider using a contrasting or floral fabric for the inner ears and heart to create a lovely design contrast.
3. Assemble the Face and Heart
Before putting the pieces together, embroider the eyes and the small nose directly onto the front of the bunny’s head. Next, sew the heart onto the front of the bunny’s body to give it that extra cute touch.
4. Work on the Ears
Sew the two pieces of fabric for each ear, right sides together, leaving the bottom open. Once sewn, flip them right side out and press them flat for a polished look.
5. Assemble the Body
Now it’s time to put your bunny together. Place the ears at the top of the head and pin the two body pieces, right sides together. Ensure the ears are tucked between the layers. Sew around the edges, leaving a small opening at the bottom for stuffing.
6. Stuff and Finish
Turn the bunny right side out and fill it with your stuffing until it reaches your desired fluffiness. Finally, close the opening using an invisible stitch for a neat finish.
Personalization Tips
Fabric Variety: Mix and match different fabrics for unique designs. Think about using pastel shades for a classic look or vibrant prints for a modern flair.
Add a Ribbon: For an extra touch of charm, tie a little ribbon around the bunny’s neck.
Gift-Making: These bunnies make wonderful gifts! Customize them for baby showers, birthdays, or even as a comforting companion for a loved one.
Conclusion
Creating your own cuddly plush bunny is not only a fun project, but it’s also a wonderful way to express your creativity and make something special. With just a little fabric and some sewing skills, you can bring to life an adorable companion that will be treasured for years to come.
So gather your materials, unleash your creativity, and let the sewing adventures begin! Happy sewing!