As the temperatures drop and winter approaches, it’s time to step up your fashion game with a stunning and sophisticated piece: the elegant belted coat. This sewing project not only allows you to create a beautiful garment but also gives you the opportunity to express your personal style and creativity. Let’s dive into the materials needed, step-by-step instructions, and some handy tips to help you along the way!
Materials Needed
Before you get started, gather the following materials:
Main Fabric: 2.5 to 3 meters of fabric. You can choose warm and cozy options such as wool, gabardine, or any other winter-friendly material that suits your preferences.
Lining (optional): 2 meters of lining fabric, like satin or polyester, if you want an additional layer of comfort.
Matching Thread: To ensure all seams blend beautifully.
Notions: Pins, tailor’s chalk, scissors, and a sewing machine.
Iron: For pressing seams and achieving a polished finish.
Detailed Measurements
To get the perfect fit, here are some detailed measurements in centimeters:
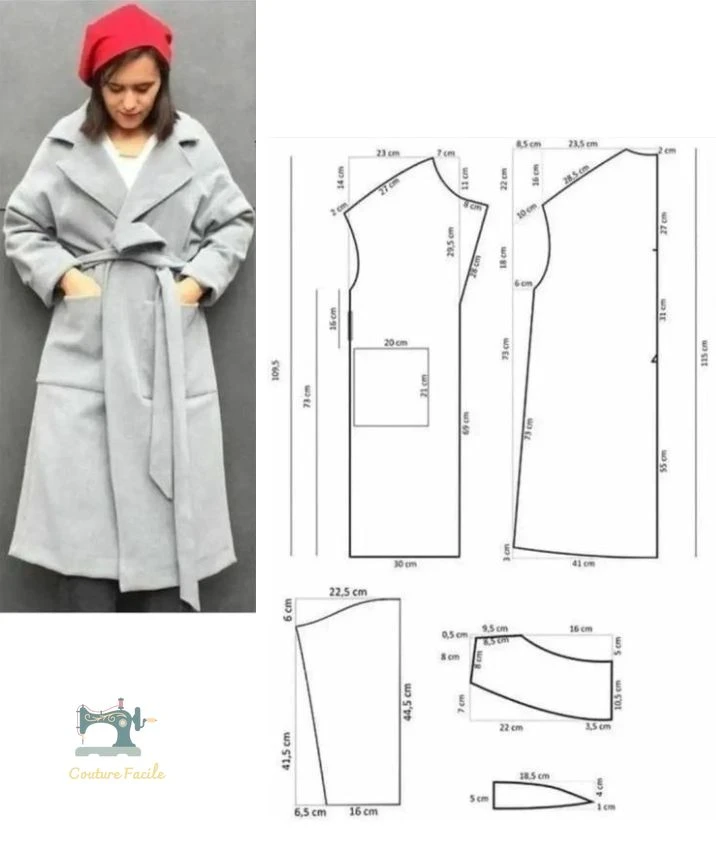
Front: Width 30 cm, Length 105 cm
Back: Width 23.5 cm, Length 115 cm
Sleeves: Length 44.5 cm, Top Width 22.5 cm, Bottom Width 16 cm
Shawl Collar: Width 22 cm, Length 105 cm
Pockets: 20 cm x 21 cm
Belt: 18.5 cm x 110 cm
Step-by-Step Sewing Instructions
1. Cutting the Fabric
Begin by cutting out all the pieces for the coat using the measurements provided. Remember to leave an extra 1 cm for seam allowances!
2. Assembling the Body
Start by sewing the front and back pieces together. Begin by joining the shoulders and then the sides. Once done, press the seams open using your iron for a neat finish.
3. Adding Pockets
Position the pockets on the front, approximately 16 cm from the bottom of the coat, and sew them in place. Pockets add both style and practicality!
4. Creating the Sleeves
Fold each sleeve piece in half lengthwise and sew along the edge to secure. Next, attach the sleeves to the armholes of the coat, ensuring a snug fit.
5. Preparing the Shawl Collar
For the shawl collar, fold the fabric in half lengthwise and stitch it around the neckline of the coat, ensuring it lays flat and looks elegant.
6. Final Touches
Finish the sleeves and hem of the coat with a neat hemline, possibly using an invisible stitch to achieve a professional look. Finally, sew the belt, ensuring it complements the coat’s design.
Tips for Personalization
Fabric Choice: Opt for a thicker fabric like wool for colder days, or a lighter gabardine for milder weather.
Finishing Touches: Using an invisible stitch for hems can give your coat a polished, tailored appearance.
Belt Details: For a structured look, consider adding belt loops to keep the belt in place.
Personal Flair: Feel free to embellish with decorative buttons or a pop of color with a contrasting lining.
Conclusion
Now you have the tools and knowledge to create your very own elegant belted coat for winter! With just a little effort and creativity, you can make a statement piece that showcases your personal style while keeping you warm and cozy. Happy sewing!
This article not only guides you through the sewing process but also encourages you to explore your creativity as you put your own touch on this winter essential. Enjoy and stay chic all season long!