Are you looking for a sweet sewing project that’s both fun and rewarding? This adorable plush bunny, or “Petit Lapin en Peluche,” is the perfect companion to create! Crafted with love, this little bunny can brighten up a child’s room or serve as a heartfelt gift for friends and family. Let’s dive into the materials needed and the steps to craft your new cuddle buddy!
Materials Needed
To get started, gather the following materials:
Soft Fabric: Choose your favorite type of fabric for the body, such as minky, felt, or cotton. These soft textures are perfect for snuggling!
Striped Fabric: Use this for the bunny’s t-shirt, adding a pop of fun and color.
Solid Fabric: Select a complementary solid fabric for the overalls.
Matching Thread: Make sure to have thread that matches your chosen fabrics for a seamless look.
Stuffing: Polyester fiberfill or any suitable stuffing to give your bunny a plush and huggable feel.
Decorative Buttons: These will be used for the straps of the overalls, adding a charming detail.
Black Embroidery Thread: For stitching the bunny’s facial features.
Sewing Tools: Don’t forget your needle, scissors, and measuring tape!
Step-by-Step Instructions
Creating your plush bunny is easier than you might think! Follow these steps to bring your adorable companion to life:
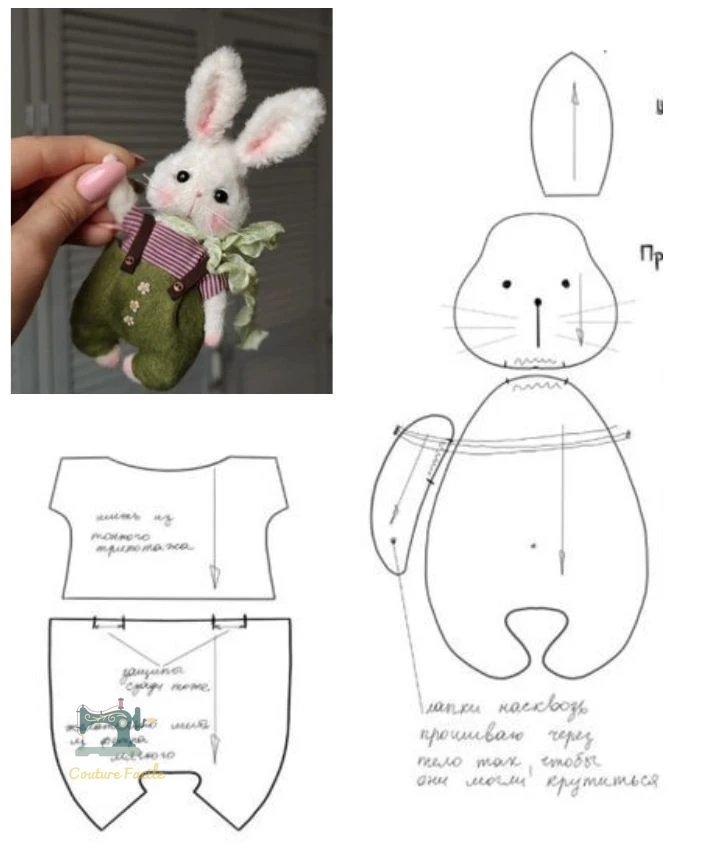
1. Cut Your Fabric
Body: Cut two pieces according to the template for the bunny’s body.
Ears: Cut out two pairs of fabric—one for the outer ear and one for the inner ear.
Arms: Cut two pieces for the arms.
T-Shirt: Cut according to the measurements provided in your pattern.
Overalls: Cut according to the pattern, ensuring to include straps.
2. Assemble the Body
- Place the two body pieces together, right sides facing. Sew around the edges, leaving the bottom open for stuffing.
- Turn the body inside out and stuff it with fiberfill until it is nice and plump. Close the bottom by sewing it shut.
3. Prepare the Ears
- Sew the sides of each ear piece together, then turn them inside out. Attach the ears to the top of the bunny’s head.
4. Attach the Arms
- Lightly stuff the arms and sew them onto the sides of your bunny.
5. Create the T-Shirt
- Follow your pattern to sew the t-shirt pieces together, then dress your bunny in its new outfit!
6. Make the Overalls
- Assemble the overall pieces, attach the straps, and secure them with decorative buttons. Adjust the fit so your bunny looks fabulous!
7. Embroider the Details
- Using black embroidery thread, carefully stitch the bunny’s nose, mouth, and eyes. This will give your new friend some personality!
Additional Tips
Fabric Choices: Consider using contrasting fabrics to add more character to your bunny.
Mobile Arms: If you want your bunny’s arms to move, you can attach them with buttons for added fun.
Finishing Touch: Add a cute bow around the bunny’s neck to finish off your creation!
Conclusion
With these simple instructions, you’ll have a charming plush bunny ready for cuddling or gifting! This project is not only a joyful crafting experience but also a wonderful way to showcase your sewing skills.
Before you start, gather your materials and make a comfy space to work. Happy sewing, and may your new plush bunny bring lots of joy!
Ready to sew? Check out the community for more tips and share your creations! 🧵✨