Are you looking for a delightful DIY project that adds a touch of charm to your home or makes a perfect gift? Look no further! In this article, we’ll guide you through the steps to create your very own soft and huggable stuffed bunny. Not only is this project a joy to complete, but it also allows you to unleash your creativity by choosing your favorite colors and patterns.
Materials Needed
Before we dive into crafting, let’s gather all the materials you’ll need:
Viscose fabric in the colors of your choice (light brown, beige, white for details).
Matching thread for sewing.
Polyester stuffing to fill your bunny.
Sewing needles and a sewing machine (optional, but makes the process quicker).
Fabric scissors for cutting.
Accessories: A ribbon for the neck or any decorative detail you like.
Fabric marker to draw the outlines.
Pattern Measurements
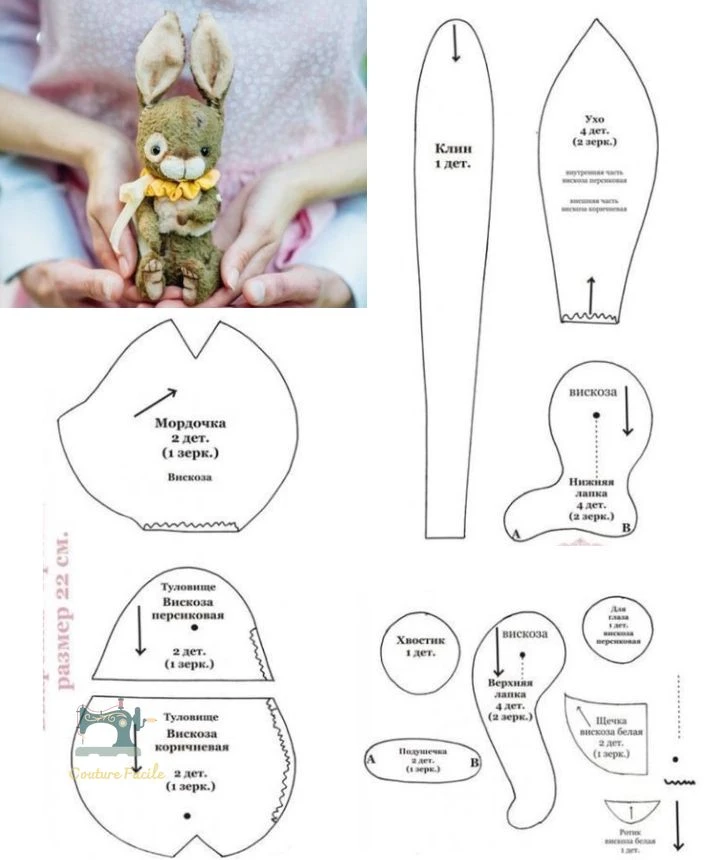
To create your perfect bunny, you’ll need the following pattern pieces:
Head: 2 mirror pieces.
Body: 4 pieces (2 for the front, 2 for the back).
Ears: 4 pieces (2 inner, 2 outer).
Tail: 1 circular piece.
Paws: 4 pieces (2 upper, 2 lower).
Step-by-Step Instructions
Step 1: Prepare the Fabric
Start by cutting out all the pieces according to the pattern. Make sure to respect the seam allowances of about 0.5 to 1 cm. It’s important to be precise in this step so that all pieces fit together nicely.
Step 2: Assembly
Sew the Head: Take the two head pieces and sew them together, leaving an opening for stuffing. This will form the face of your bunny.
Assemble the Body: Next, sew the two body halves together. Once this is done, attach the head and the paws at their respective positions, ensuring they are secure.
Create the Ears: For a structured look, sew the ears by doubling the fabric. This gives them a lovely dimension and keeps them standing upright.
Step 3: Finishing Touches
Flip the Pieces: Turn all sewn pieces right side out.
Stuff the Bunny: Fill the head and body with polyester stuffing, then carefully close the openings with invisible stitches.
Attach Ears and Tail: Secure the ears and tail in place by hand-stitching them to the body.
Step 4: Decoration
Now comes the fun part! Personalize your bunny by adding a small ribbon around its neck or embroidering the eyes and nose for added character. For a vintage effect, consider using slightly aged-looking viscose fabric.
Additional Tips
- If you’re making this bunny for a child, embroidering the features will ensure safety and durability.
- This stuffed bunny makes a wonderful gift or a sweet decoration for your own home.
Conclusion
Creating your own stuffed bunny is not just a rewarding craft but also a wonderful way to express your creativity. Once completed, you’ll have a soft and unique plushie that’s full of personality. So gather your materials, pick your colors, and let’s start sewing!
Are you ready to bring your bunny to life? Happy sewing! 🧵❤️
Feel free to ask any questions or share your finished bunnies in the comments below! We’d love to see your creativity at work.