Creating a handmade fabric doll is a delightful project that brings joy to both the maker and the recipient. Not only is this adorable doll easy to make, but it also serves as a wonderful gift for children or a charming decoration for any room. In this article, we’ll guide you through the necessary materials, simple steps, and tips to help you craft your own unique fabric doll. Let’s dive in!
Necessary Materials
Before you start, gather the following materials:
Cotton fabric for the doll’s body, arms, and legs (a solid color for the skin and a patterned fabric for the clothing)
Matching thread to ensure all your stitches blend beautifully
Polyester stuffing to give your doll a soft and cuddly feel
Buttons (optional) for decorative features
Needle and thread for hand sewing, or a sewing machine if preferred
Ribbons or yarn for the doll’s hair
Printed pattern (easily available online) for creating the doll shapes
Step-by-Step Instructions
1. Prepare the Pattern
Start by either printing the doll pattern or tracing it onto tracing paper. Carefully cut out the pieces from the pattern and transfer them onto your chosen fabric.
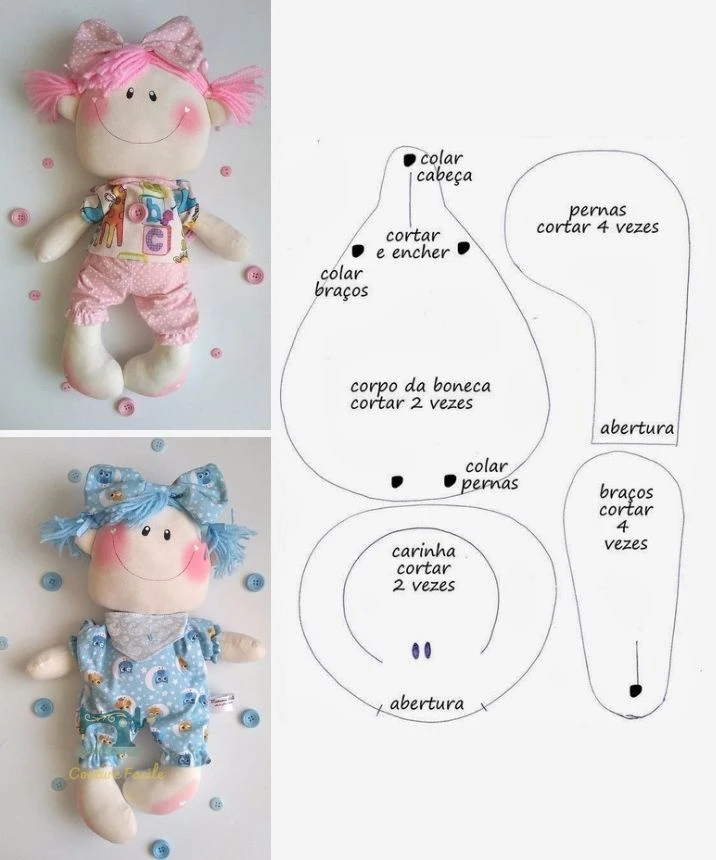
2. Cut the Pieces
As you prepare the fabric, make sure to cut the following:
Body: 2 pieces
Arms: 4 pieces
Legs: 4 pieces
Face: 2 pieces
Remember to leave an allowance for seams (if not included in the pattern).
3. Assemble the Limbs
Take the arm and leg pieces, place them right sides together, and sew the edges, ensuring to leave an opening for stuffing. Once sewn, turn them inside out, fill them with polyester stuffing, and close the openings with invisible stitches.
4. Create the Body and Head
Position the body pieces right sides together and sew them, leaving the bottom of the body open. Turn it inside out, stuff it well, and sew the bottom closed. For the face, attach the two pieces together, stuff it lightly, and sew it onto the top of the body.
5. Attach the Limbs
Using the instructions from your pattern, sew the arms and legs onto the body securely.
6. Add Hair and Details
Get creative! Use yarn or ribbons to create lovely hair for your doll, attaching it to the head with glue or stitches. Embroider the eyes, nose, and mouth, or use buttons for a fun accent.
7. Make the Doll’s Clothes
Using the pattern or your creativity, sew an outfit for your doll. Add fun accessories or embellishments like bows or ribbons to personalize it even further.
Tips for Success
- Use colorful fabrics to add personality to your doll!
- If you’re gifting the doll to a child, avoid small elements like buttons to ensure safety.
- Feel free to improvise with the design; every doll can be unique!
Conclusion
Crafting your own fabric doll is not only a rewarding experience but also an excellent way to express your creativity. Whether it’s a gift for a loved one or a treasured decoration for yourself, this project is sure to bring smiles and laughter into your home. Gather your materials and get started on this heartwarming sewing adventure! Happy sewing!