Are you looking for a delightful sewing project that sparks creativity and fun? Look no further! This adorable fabric turtle is the perfect addition to your crafting repertoire. Not only does it bring a playful touch to any room, but it can also serve various purposes – from a toy to a decorative piece or even a pin cushion for sewing enthusiasts. Let’s dive into the materials and steps needed to create your very own fabric turtle!
Required Materials
To embark on this charming sewing adventure, you will need the following materials:
Colored Fabrics: Choose vibrant fabrics for the turtle’s body, legs, head, and decorative details. Feel free to mix and match to showcase your personality!
Felt: This will be used for charming motifs like flowers and hearts, adding an extra touch of whimsy to your turtle.
Stuffing: Use cotton or polyester fiberfill to give your turtle a soft and cuddly feel.
Sewing Thread: Pick a thread that matches your fabrics for a neat finish.
Ribbon: This is optional but can be used to create a hanging loop for your turtle.
Tools: Make sure you have a sewing machine, pins, scissors, and tailor’s chalk to help you along the way.
Main Measurements
To ensure your turtle comes out just right, here are some approximate measurements to guide you:
Body: Approximately 12 cm in diameter.
Head: Length of about 7 cm.
Legs: Diameter of around 4 cm.
Decorative Motifs: Various sizes ranging from 2 to 4 cm for flowers and hearts.
Step-by-Step Instructions
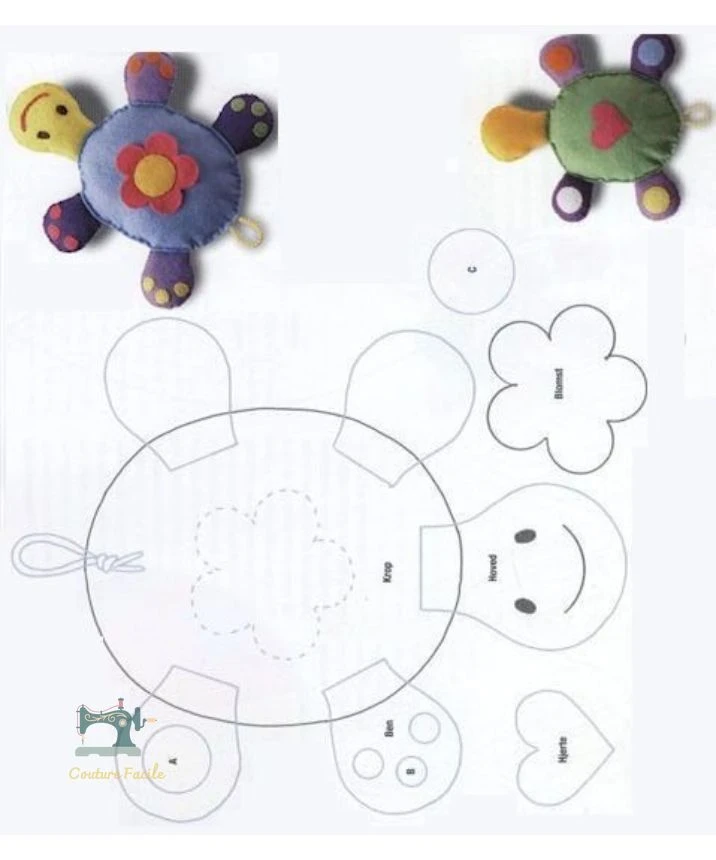
Cut the Pieces:
Start by tracing the shapes of the turtle onto your chosen fabrics using tailor’s chalk. Cut out two pieces for the body, four for the legs, one for the head, and additional pieces for decorative elements.Add Decorations:
Before sewing everything together, take your felt and attach the flowers, hearts, or other motifs onto the top of the turtle’s body. You can secure them with stitching or by using fusible webbing.Assemble the Legs and Head:
For each leg and the head, sew two pieces together, leaving an opening for stuffing. Once sewn, turn them inside out, lightly fill with stuffing, and close the openings with hand stitches.Construct the Body:
Place the legs and head between the two body pieces (with right sides facing). If you’re using ribbon, fold it in half and place it at the top for the hanging loop. Pin everything in place securely.Final Assembly:
Sew around the entire perimeter of the body, leaving a small gap to turn it right side out. Once done, flip the turtle right side out and fill it with stuffing. Close the gap with an invisible stitch for a clean finish.
Tips for Success
Use Recycled Fabrics: This project can be eco-friendly! Consider using fabric scraps to create a colorful turtle.
Safety First: If the turtle is intended for small children, avoid using detachable elements to ensure it’s safe.
Versatile Use: This fabric turtle can be a cuddly toy, a charming home decoration, or a handy pin cushion for all your sewing needs.
Conclusion
This fabric turtle is not just a fun craft project; it’s also a unique way to express your creativity! Customize it to suit your style, and enjoy the process of bringing your turtle to life.
Happy sewing! 🐢✨